Basics and Fundamentals
Creating a Quarkus Application
mvn "io.quarkus.platform:quarkus-maven-plugin:create" -DprojectGroupId="com.redhat.developers" -DprojectArtifactId="tutorial-app" -DprojectVersion="1.0-SNAPSHOT" -Dextensions=rest
cd tutorial-app
The quarkus CLI tool lets you create projects, manage extensions and do essential dev, build and deploy commands using the underlying project build tool in a simplified way.
Follow these instructions to install Quarkus CLI: https://quarkus.io/guides/cli-tooling
Then create the application:
quarkus create app -x rest com.redhat.developers:tutorial-app:1.0-SNAPSHOT
cd tutorial-app
All the remaining parts of this tutorial assume that you’ll be working inside the project folder that was just created. In this case, tutorial-app.
|
Build and Run the Quarkus Application
| Maven | Quarkus CLI |
|---|---|
|
|
To run the application in jvm mode
java -jar target/quarkus-app/quarkus-run.jarQuarkus simplifies the compilation of Java applications down to a native binary using GraalVM/Mandrel. To do so, add a "native" flag to your build command.
To force building a native binary in a GraalVM Mandrel container, add -Dquarkus.native.container-build=true.
|
| Maven | Quarkus CLI |
|---|---|
|
|
| Native compilation will take few minutes to complete. |
To run the application in native mode
./target/tutorial-app-1.0-SNAPSHOT-runner| Maven | Quarkus CLI |
|---|---|
|
|
| Native compilation will take few minutes to complete. |
The above command will build a native binary of the Java code and then copy it into a container image. Start the container that runs the native binary:
docker run -it --rm -p 8080:8080 tutorial-app:1.0-SNAPSHOTYou’ll see an output like this one:
__  ____  __  _____   ___  __ ____  ______
 --/ __ \/ / / / _ | / _ \/ //_/ / / / __/
 -/ /_/ / /_/ / __ |/ , _/ ,< / /_/ /\ \
--\___\_\____/_/ |_/_/|_/_/|_|\____/___/
2023-07-07 11:47:14,046 INFO  [io.quarkus] (main) code-with-quarkus 1.0.0-SNAPSHOT native (powered by Quarkus 3.2.0.Final) started in 0.019s. Listening on: http://0.0.0.0:8080
2023-07-07 11:47:14,047 INFO  [io.quarkus] (main) Profile prod activated.
2023-07-07 11:47:14,047 INFO  [io.quarkus] (main) Installed features: [cdi, -reactive, smallrye-context-propagation, vertx]
Notice how fast Quarkus was ready to serve your requests. In this particular example Quarkus only required 0.019s to start.
You can open your browser with the url http://localhost:8080/hello and you should see a response like hello.
Or else if you’re a CLI person, you can run a curl command like:
curl localhost:8080/helloHello from Quarkus RESTStopping the application
You can stop your running application by issuing a CTRL+C in your terminal.
INFO [io.quarkus] (main) tutorial-app stopped in 0.035sQuarkus was able to stop in just 0.035s. Fast to start, fast to stop. Fast always!
Testing your application
The scaffolding process also creates a test case for the example endpoint.
Check the file GreetingResourceTest.java in the folder src/test/java to see what a Quarkus integration test looks like.
When running this test, the application is started once, then all tests are executed, and finally, the application stops. Although it is not mandatory, by default the RestAssured project is used to test Rest endpoints but it is up to you to change that.
You can run the test in your IDE or by running the following:
Open the Project in your IDE
Open or import the generated project into your IDE.
If you are using vscode you can open the project with:
code .
If you use tutorial-tools, your host quarkus-tutorial/work contains the application code; point your IDE to this directory.
|
Live Coding (Development mode)
Stop the Quarkus application that might be running in jvm or native mode.
Live Coding or Development mode enables hot deployment with background compilation, which means that when you modify your Java files and/or your resource files and refresh your browser, these changes will automatically take effect.
This is probably one of the best features of Quarkus: enabling a very fast and productive iterative feedback loop.
Let’s start the Live Coding mode by invoking mvn. You probably won’t need to stop/start Quarkus again during this tutorial:
By default Quarkus uses 'localhost' for the dev mode host setting. If you are working in a remote development environment, you may need to set the host to 0.0.0.0 by appending -D"quarkus.http.host=0.0.0.0" to the above command.
|
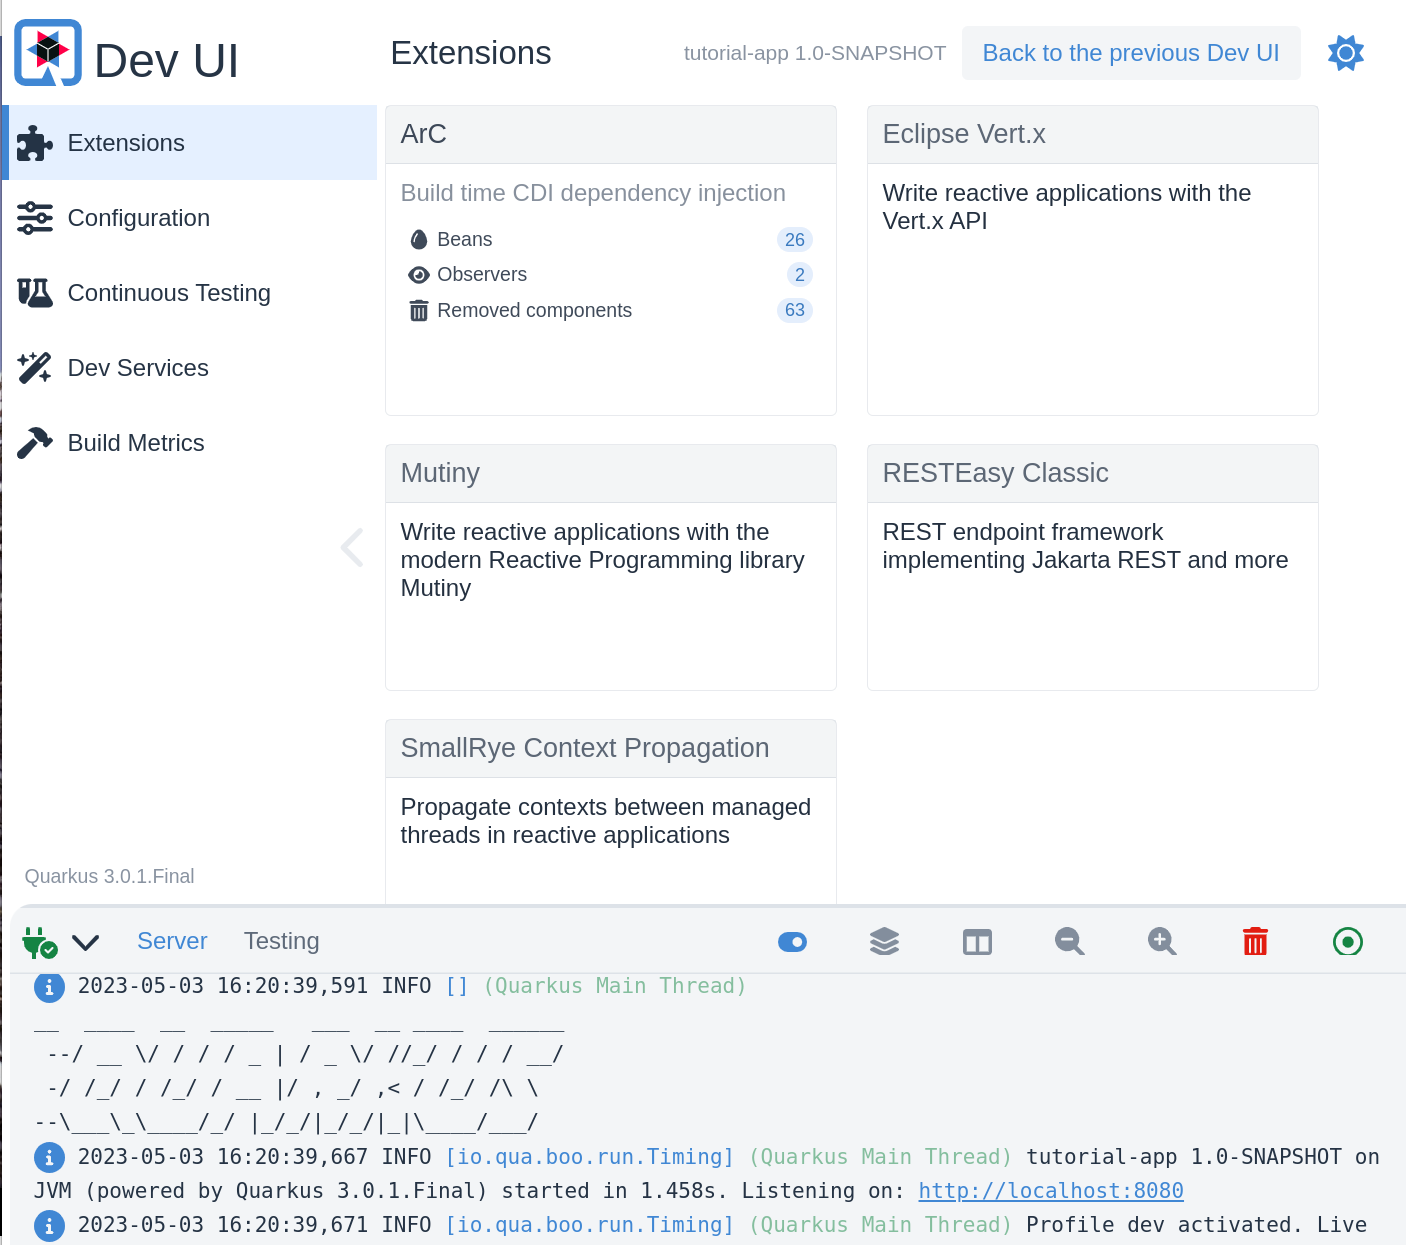
Dev UI
Quarkus ships with a Dev UI, which is available in dev mode at /q/dev by default. It allows you to quickly visualize all the extensions currently loaded, see their status and go directly to their documentation.
Continuous Testing (Development mode)
Quarkus supports continuous testing, meaning that your tests will run immediately after code changes were saved. Your application should already be running in dev mode.
At the bottom of the screen you should see the following:
Tests paused
Press [r] to resume testing, [o] Toggle test output, [h] for more options>
Press r and the tests will start running. You should see the status change down the bottom of the screen as they are running, and it should finish similar to this:
All 1 test is passing (0 skipped), 1 test was run in 11705ms. Tests completed at 16:02:32.
If you don’t want to have continuous testing enabled, you can change this by adding quarkus.test.continuous-testing=disabled in application.properties.
|
You can find more details about controlling continuous testing in this guide.